Thursday, December 8, 2011

Two pieces swimsuit

Here is the first swimsuit I made, even before the 1 piece posted earlier.

2 pieces swimsuit

For the pattern, I copied one of my swimsuit and did some changes to the top. I also added the heart cut-out so I will sport a nice tan-tattoo next summer!

swimsuit

I can't wait till next summer to try it at the pool!
Overall, I'm glad with it.

Friday, December 2, 2011

One piece swimsuit

I wanted to post everything I've been doing this semester in the order I sew them. But, well... I'm procrastinating a lot and I still haven't taken the pictures. So I figure it's better if I just post what I already have.
So here is the one piece swimsuit for my knitwear class. It's actually my second swimsuit, but you'll have to wait to see the other one.

one piece swimsuit

The teacher gave us a pattern but it was too vintage for my taste. I changed it so it shows more legs (it was almost like a short...)

Side view:
side swimsuit

Speaking of legs, I really had a hard time with the tension.
So let me explain that a bit more. Dealing with knitwear is usually pretty easy as long as you use a serger (sorry, a merrow machine). But when you have to add an elastic (and I'm not speaking here of elastic thread), you have to play with the tension of it. Meaning, you have to pull more or less on it to achieve the perfect tension.
This can be done just by hand, but it needs some training to get it just right, or with a tensioner. This thing is supposed to help as it regulate the tension but well, that's actually pretty crappy as it sometimes decides to do whatever it wants. So you end up with something all wrong. That's how, one leg was perfect and I add to redo the other one 4 times! It was starting to be annoying!


back swimsuit


But veni, vidi, vici. I'm now done with it.

Well, I guess I need to spend time just learning to do that by hand, without tensioner. But I will need a break with swimsuit. Which is perfect 'cause... it's winter!
Even if it did annoy me, I will do more swimsuits later. But I'm more into 2 pieces.

Thursday, November 17, 2011

My first short

After a month without any post, it's about time to show you what I've been doing for my classes.

Let start with the 1st garment made for "fashion Design". It's a lined short (aka hot pants).

short

The teacher gave us the pattern and had to add some trimming. As you can see, I got inspired by the military/navy..

I like it. Even more with a red or white top and high heels. But... It's not my size *sigh*
I have a safety pin in this pic, or it would look like it's a really low waisted, baggy short!

Oh, and the lining if playful: that's a black red and white dotted fabric.


I'm trying to find motivation for posting everything before Xmas, so here is a list or what I still have to show you.
For Design Construction:

- a capri pant
- pants
- a bolero jacket
- a biais top (working on it right now)
- a peplum jacket (the next and final project)
For knitwear:
- a legging
- a turtleneck top
- a 2 pieces swimsuit (Have to redo the top)
- a 1 pice swimsuit (to be finished)
- a dress (final project - will probably start next week)

Oh I have to show you the pictures of my up-cycled gown!

Saturday, October 15, 2011

Upcycling Fashion Show: my paper dress & plastic jacket

In about 2 weeks, my school will hold a runway show/contest about upcycling called "Flash & Trash". I am right now working on my look for the event.

But last month, I got the opportunity to present for a runway an upcycling look I made especially for the First Lady Eco Bash fashion show. It was such a great opportunity to present for the 1st time something on a show! I also helped backstage as a dresser. That was crazy but we had so much fun!

So here is the look I created:

Upcycling fashion dress & jacket

Isn't she cute?
Everything is made out of grocery bags: the dress from dyed paper bags and the jacket from ironed plastic ones.

I think this look is quite simple, mainly if you compare it to the others. But I like it nevertheless. It's so me!
Well, I have to admit that I had plan something a bit more dramatic for once, with a belt and headpiece. But we were in such a rush backstage that my model had to walk out before I got her fully ready. If I was deceived at first, I'm finally happy it happened as I prefer it this way!
Plus, I got the chance to add what was missing for the finale, so here is a sneak peek of what she was supposed to look like:

Upcycling paper plastic bags

Oh, and did you notice the necklace? I love it. I made it with plastic bags and metal can tabs!!!

And cause my models wasn't alone in this show, here are some pictures of the amazing other looks:

Upcycling show

It's now time for me to go back on my Flash & trash project. See you soon!

Tuesday, September 20, 2011

Fashion Night Out


As you might know, September 8th was the Fashion Night Out.

So with DH, a friend from school and another couple of friends we decided to go to the Galleria. Here, in Houston, the Galleria is THE shopping experience. You can find anything from Zara to Dior. They have a whole lot of boutiques and shopping superstores like Nordstrom and Macy's.

For the Fashion Night Out, they had DJ in the common area with complimentary drinks. Many shops offered drinks as well and sometimes lite bites.

We figured it should be the perfect evening to dare enter all the designer boutiques. That's why we went there instead of following NY or Paris Fashion Night Out online.

So for the music and drinks, all was perfect. That's just so nice to hang around designer clothes, and champagne glass in one hand. And everyone dressed up for the event. It was as interesting to look at the stores as to look at people. I loved it.

I was kinda of deceived by the lack of people who dare to enter the high end boutiques. On some of them, we were the only clients!
If I got really disappointed with Dior, all the others exceded my expectations: security and sellers were nice and they were offering champagne glasses and sometimes food.
My fav' was Yves Saint Laurent because they offered macarons coming right from NY and they made me try on something I'd die for! I'm sad I could find it online, at least to post a picture of it here. I'm not even able to describe it...

And at the end of the evening, there was a runway show with fall trends:


The runway ended with a whole lots of women coming up the stage and dancing on Party Rock Anthem from LMFAO. I loved it:


And yes, I dressed up for the event:


Please, be kind to me as that's my 1st step in the fashion world!
I wasn't that bad with the high heels and skinny belt, wasn't I?

I really loved looking at all the designer clothes with my friend from class. We basically checked silhouettes, colors, materials, dart, finishings... of every garment!
And looking at the people and runway with husband and friends was really nice. I'm definitely going back next year!

Sunday, September 4, 2011

My 1st dye!

For my next dress I choose a Vogue pattern from Guy Laroche. And I indulged myself with an order of silk chiffon and china silk.

But 'cause it's cheaper, allow me to have the exact same color for the lining and it was time for me to experiment I ordered it natural, with some dye.

So here comes my first dying!

dyeing silk

I'm happy with the results as it's even. I was really worried about that!
I'm not sure the color is what it should have been though (Navy Blue). The color is actually brighter than the picture. I had no way to weight my fabric, so I not sure I used enough dye... But I like the color I got. That should look gorgeous with my new shoes.

I now have to work on the pattern because the review for this pattern are pretty bad. So, I'm gonna drape it... on my unfinished duck tape dress form!

Tuesday, August 30, 2011

Back from shopping!

I'm just coming back from some shopping.
I bought awesome shoes, a lining fabric (black white and red) for my class project and a Navy Blue dye. I got the the black cotton pique fabric yesterday, to make a Hot short (no I didn't come up with the name... the teacher did!) for my class.
The other fabrics come from Taiwan (Thanks Faye!) It's a really nicely textured cotton linen blend. I will use it for handbags with printed fabrics and jackets!


Yesterday evening, I also order some silk chiffon and china silk to make this Guy Laroche dress to go to the Fashion Night Out.
FNO is actually on September 8th and I will have to dye the fabric (that's gonna be a first for me!), so... I'm not sure it's gonna be ready.

I'm so excited!

Sunday, August 28, 2011

Draping Class, Final Project

So here is the dress I created for my finals.
I had to make a showstopping dress Leighton Meester (Blair in the Gossip Girls tv series) would wear for the MET Costume Gala 2011 in New York.
First, Thanks to our teacher for this final. It was a really nice and intersting project.
Well, for the story, the actual gala was in may and she was wearing a little black dress by Louis Vuitton!

I searched for everything she's already been wearing on red carpets and the least I can say is that she's really fashion forward. She's been wearing a whole lot of different styles. So I had to be imaginative!

After an afternoon of looking at her and her looks, I ended up with this inspiration (I don't remember what show it was!) and sketch:


I was thinking about using chiffon and leather.
But the next day, and after seeking advices from DH and one of my classmates, I knew it was way to casual for her...
I like the sketch though, so who knows, I might end up sewing that for myself one day.

I had to find another idea, looking at all the 2011 fall fashion show.
The trends I was interested in for her dress included: plunging V-neck, sheer fabrics, pleats, leather and, why not, orange!

Here are some of my sketches, mainly inspired by Vera Wang Fall 2011 Collection

Sketches for Leighton Meester

You can see the plunging V-neck is a really strong inspiration... as are the sheer fabrics!
I'm also fond of sheer maxi-dresses. I'd like to sew one for myself. I'm amazed on how my taste have changed since I entered the fashion design program and started following the couture collections and fashion magazines (Thanks Julio!)

Ok, sorry, we're not here to speak about my fashion taste.
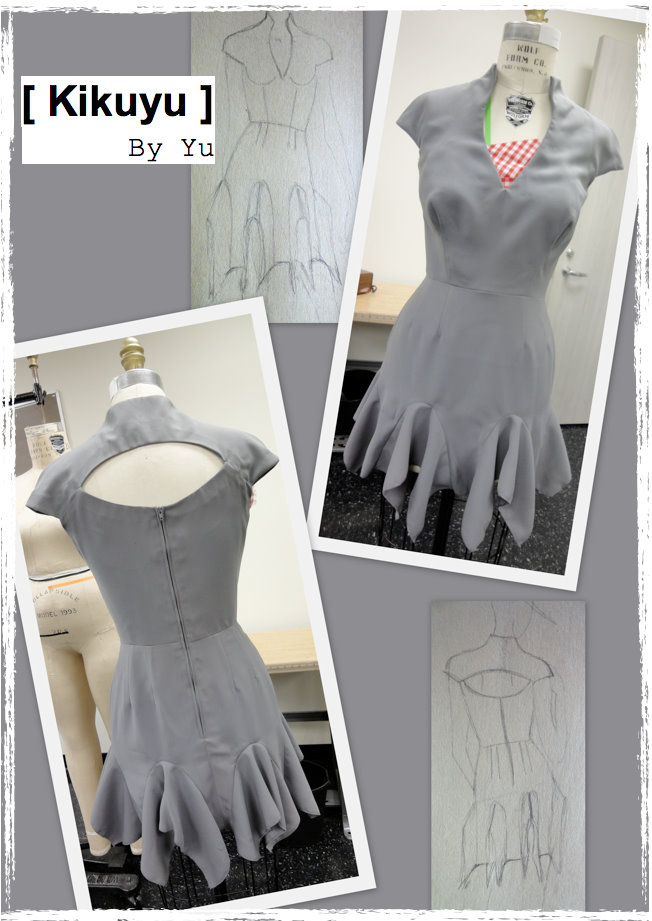
So back to our subject, the winner was a shorter dress, as Leighton seems to be fond of them... and I didn't wanted to buy loads of fabric!

So here is what I made, out of taffeta and chiffon (you'll recognize the sketch):

Leigthon Meester dress for MET Gala - draping class

I love the back!
On the other hand, for the front I would have preferred a more dramatic top, to better match with the bottom. I should have done the lapels wider, to get a look closer to the sketch...

I'm not really happy with the finishing. I know I'm able to do something much nicer. But I did pick a dress kind of too hard for me in the amount of time I had.
I finished the dress at 8.45pm for a class finishing at 9pm! Ouf
It was kind of like in Project Runway.

My biggest regret?
I wasn't there the day of the party when everybody had to turn in the dresses. So I still haven't seen the dresses the others have done. Some where already looking awesome. Tomorrow my friend is gonna show me the pics he took. I can't wait!


Sunday, August 21, 2011

Flat Pattern 1, Final project

Finally the classes are done and I have some free time. So here is my final project.
The goal was to use a basic sloper size 8 and modify it to get the design we wanted. You can see my inspirations on the previous post.

Flat pattern final project

I'm not fond of the front look, but I think it's mainly because the mannequin has a cup size way smaller than the sloper...

Beside that, if I had to redo it I would:
- use a heavier fusible interfacing so the collar would stand better
- use a stiffer fabric, this one was really annoying to press (it was becoming clumsy as soon as it was warmed under the iron)
- I would make the set-in collar a bit higher
- I would like the back opening wider and larger, much like the sketch.

But yes, I'm not easily happy with what I'm making. The good point though is I did everything from start to finish for the first time: I started with the sketch, then making the pattern to finally sewing it.


Here are some other students dresses:

Flat pattern class other students designs

Nice, isn't it?


Saturday, July 30, 2011

Draping & Flat Pattern Finals in progress

The summer classes at my college are coming to an end. Therefore, it's time for our final projects.

First, the final project for the flat pattern 1 class.
We have to make a dress with a natural waistline as we're using the bodice and skirt sloper (we've done the torso one, but it's to be used for flat pattern 2).

I wanted to make a dress without using a whole lot of fabric, so exit the circle skirt. I choose a straight one but wanted to play more, so I looked up for godet. That's how I ended up with my main inspiration: Alexander McQueen Ready-to-Wear Spring 2011 by Sarah Burton.
I also wanted a V-neck with a built-up collar, so when I found the advertisement in Bride magazine, I knew it was a hit!

So here are my sketches (the first ones!!! but ok, I did copy the body silhouette) with the plain gray (not so Alexander McQueen, I know... but so me!) fabric I'm using:

Flat pattern - McQueen inspired dress

Right now, I'm sewing it, so I should be done by Thursday.


For the draping class, we've been doing a soft bustier to try the Madame Grès technique for pleating. That's a lot of hand sewing! For the grade we just need to stitch a few rows so I will finish it after the end of class, as I'm pretty busy right now...
I'm happy because I adjusted the bustier size to mine. So I will be able to wear it!

Madame Gres Technique Bustier

Oh, and for the multi-colored grosgrain ribbon well... It will be fully covered, so I used some leftovers from my millinery class.

But wait, that's not the final.
So for draping the teacher made us pick an envelope.
Here is mine:

Draping Final Project

Isn't it a GREAT idea? I love it. Thank you Vi.
So now I have one week and half to sketch, go fabric shopping, drape, do the pattern and sew a dress Gossip Girl actress Leighton Meester would wear for the MET Costume gala!
It would be so awesome if it could be for real...
Anyway, I hope I'll be able to come out with something she would actually wear. Maybe I can send it to her ;-)

So that's gonna be a hell of a week for me. I never had a big timed challenge, and now I have 2!

Stay tuned for the final pics'

Wednesday, July 27, 2011

My draping class

I've been talking here and there about my sewing classes at the community college. I love that so much I'm following 2 classes this summer: flat pattern I and draping. As the time goes by pretty fast, we are starting our final projects! I'll sow you pictures of my work on finals in due time.

So here, I'm gonna show you what we've been working on in draping, but not before a short intro.
I took draping thinking it was the opposite of Flat pattern making. I thought I would directly drape the fabric on the mannequin to easily make a floaty chiffon or satin evening dress.
So you can imagine my disappointment when I discovered we actually had to work with muslin, in order to make a pattern!!! I though it was a waste of time when I could use a ready sloper from flat pattern!

But I finally like this class, and I now understand how you just can't do everything just by flat pattern or just by draping. I'm so glad I took both classes at the same time.

Here are the pictures of some draping I did in class: a bodice, a torso, a cowl neckline and a mandarin collar.

draping

My new dream: to have a custom made professionnal mannequin!
So yes, I'm making a duck tape mannequin right now, But I'm not sure I like how it turns out!

Monday, July 25, 2011

I received my fabric order

Last Wednesday, it was Christmas in July: I received my fabric order from fabric.com!

As you can see, I'm really fond of plain and neutral colors:
fabric order

I already have some plans for some fabrics:
- The gray one on the top left corner is for my pattern making class. I will make an Alexander McQueen inspired dress out of it, if I don't change my mind for the pattern or fabric...
If I have enough leftover I will also make a jacket
- The 3 fabrics on the top right corner are for a skirt and 2 tops. I have the whole projet in my mind, but it might take a while before I start. But I could show you the sketches I made.
- The dotted yellowish cotton on the bottom left will be dyed. I will probably use that for some tops, tunics....
- Since fabric.com ran out of the wine colored organza I ordered (6 yards!), they offered my the black netting and the white/gray/black print. I love the print and the hand of this fabric (cotton?) is awesome! That was a great surprise, as I discovered this fabric whil opening the box.
- I plan to use the pink chiffon as lining for a black lace dress. But I still need to find a nice lace!
- And the blue fabric, well... I have no idea!

I went more printed and colorful for the cotton prints:

fabric order

I plan to use those, with some plain colored fabrics, for handbags or accessories.

I guess now I just have to start sewing again!

Monday, July 18, 2011

Millinery class: Wide brim white sinamay hat with feathers

Here is my 7th and last hat made during my millinery class.
It's a wide brim white sinamay hat, trimmed with black sinamay and rooster feathers.

Sinamay hat with feathers

This hat has probably the biggest WOW factor among the 7 I made.

wide brim white hat

You can see the green shine of the black rooster feathers:

feather & sinamay, white and black

Here are some pictures during the construction: you can see the sinamay blocked on the wood blocks and the hand sewing for the sweatband.

Steps wide brim sinamay hat

Conclusion about my millinery class: I really loved making hats and I will continue to do so. I'm also thinking about taking millinery class again so I would work with felt...

So, among my 7 hats, which one is your favorite?

Wednesday, July 13, 2011

Millinery class: Black sinamay hat

Among the 7 hats I made for the class, here is my favorite:

Black Sinamay hat

I just love it! I would actually wear it wear it a little more forward.

I used black sinamay and satin for the trimmings.

Black Ceremony hat

Here a picture at the Spring Fashion show at my college:

Millinery sinamay satin hat

The steps:

Millinery black hat

For the class, we didn't have to make sinamay hat. Actually, the 5 hats I made before were enough. But the teacher was nice and since I wanted to play with sinamay, she explained to me how to do that.
I'm now a huge fan of sinamay. I love how you start with a simple bolt of sinamay "fabric" and you end up with a hat. And the possibilities are endless.

I know it doesn't look like it by the pictures, but you need quite a lot of time to make a hat. For each step, you have a whole lot of had sewing (my fingers hurt just by thinking about that...). But the final product definitely worth it!

I love it, but to wear it I still need:
1) To sew in an elastic
2) An event!!!

Hope you like it too!

Thursday, July 7, 2011

Buttercup Bag, again!

I already sew it twice. I like the bright yellow/green one, but you definitely don't want to use it everyday... So I needed a new one to match my neutral summer clothes.

I really like this pattern and it's free! Could it be any better?

buttercup bag


bag free pattern

This time I used a magnetic snap, and I love it.

buttercup bag inside

Monday, July 4, 2011

Millinery class: Cocktail hat "Americana"

Today is THE day to present my other cocktail hat:
Americana

Cocktail hat Americana

This hat is sooo American: beside the colors, I used an old Levi's jean, and some 100% American silk for the trimming.

Cocktail hat silk

Here are the steps to make it, but before to create the right ambiance, a music I like:

So, the steps:
I smoothed 3 layers on the head shaped wood block (the kind I used for the 1st picture).
Each layer was moisten and really smoothed on the block, before starting with the next layer.
The first layer was a black satin (lining), the second was the buckram (you can see it on the picture below), and the third was the jean.
Once everything is totally dry, I had to decide the shape I wanted it. I did a drop:

Cocktail hat

Next, I added a metal wire all around, before sewing some bias (hand sewn!)

I added a comb inside the hat to make it stand on the head. The last step is the trimming: the silk flower!

Happy Fourth of July!!!


Friday, July 1, 2011

Millinery class: Cocktail hat "Bird of paradise"

I called this cocktail hat "Bird of Paradise" for its similarity with the flower.

Cocktail Hat bird of paradise
The yellow dots are only my pins...

The side view make the name even more obvious.
I lightened the picture so you can see the pleats and texture in the black wool.

millinery cocktail hat

The white triming is in sinamay. I lined this hat with a vintage American silk scarf (you'll see mor eof this fabric in the next post... on July 4th!).

Friday, June 24, 2011

Millinery class: My straw hat

Now that you know how to block a hat, here is the first hat I did block:

Millinery straw hat


Straw hat

The teacher asked us to bring an old straw hat to refurbish it. I was lucky enough to get one for free and not having to drive all around town 'cause the school was giving away this one just the day after!
You can see the before/during/after here:

refurbishing a straw hat

I think it was some kind of gardener hat, but didn't have any shape anymore. I first wanted to make a cowboy hat out of it: it was rodeo time, here in Houston. But after blocking it, I realized it was kinda awful.

So I blocked it again, and made a more formal hat. The formal look is due to the shape of the wood block and the satin trimming. This hat would be perfect for a wedding!

Even though it looks easy, I'm still amazed by the amount of time you have to work on a single hat! Just to hand sew the sweatband always take me forever!

Monday, June 20, 2011

Millinery class: Blocking a hat

I deeply loved to learn millinery. I'd love to become a milliner.
You've already seen my beret and pillbox.
For the 5 others hats I made for the class, we needed to block.
So here are all the blocks available at the college.

blocs a chapeaux
I WANT the same closet! Isn't it a dream?

I'm so in love with the large choice of blocks!
On the left closet, you can see the steam maker we used.

So here is how to block a hat:
  1. You choose the wood block you want and you cover it with some plastic wrap (to avoid any stain on your hat and any damage on the wood block)
  2. Moisten your straw/buckram/fabric/felt/hat
  3. With steam and your hands, make your material smooth on the block by using pins/strings/elastics to maintain it as you go
  4. You can add some stiffener if needed
  5. Let it dry on the block (we let them a week, until the next class)
Tadam! You blocked your hat.
You now have to sew the different part together, add a sweatband and trim it!


Here are several of my hats drying:

mes chapeaux qui sechent

You can see straw (the pinky one on the 1st pic, that's a vintage hat I still have to finish), sinamay (brown, black and white - I'll do the brown... later!) and fabric + buckram (1st pic, to make cocktail hats) .

I need blocks at home to continue making hats!!!

Friday, June 17, 2011

I want that look!!!!

Ok, so for once I'm not gonna speak about sewing.
I just want to show you an outfit I've been dreaming of lately.


I love this blazer and the skirt is awesome. I have to think about making/buying a blazer for this summer to beat the A/C.
And gray..... that's my fav' color!

Ok, ok, for the people who know me, that's not really the kind of stuff I'm wearing. But I could change, right?

Wednesday, June 15, 2011

Millinery class: Pillbox hat

After my béret, here is the second hat I did for the millinery class.
It's a pillbox hat.

pillbox millinery

The fabric is shinny, so It's not easy to get the real color on picture. I guess the picture below is somehow closer to the real fabric, but een for the eye, this fabric looks more or less dark. But I love it (I'd like to make a bustier out of that!)

Millinery pillbox hat

Here are the steps to make it. You can see the inside Buckram and the metal wire I sew inside (3 wires in all).

pillbox details

The hat looks even better on me. With that on, I'm as glamour as Jacky Kennedy with her pillbox! I have to find a dress to go with, though...