Friday, June 24, 2011

Millinery class: My straw hat

Now that you know how to block a hat, here is the first hat I did block:

Millinery straw hat


Straw hat

The teacher asked us to bring an old straw hat to refurbish it. I was lucky enough to get one for free and not having to drive all around town 'cause the school was giving away this one just the day after!
You can see the before/during/after here:

refurbishing a straw hat

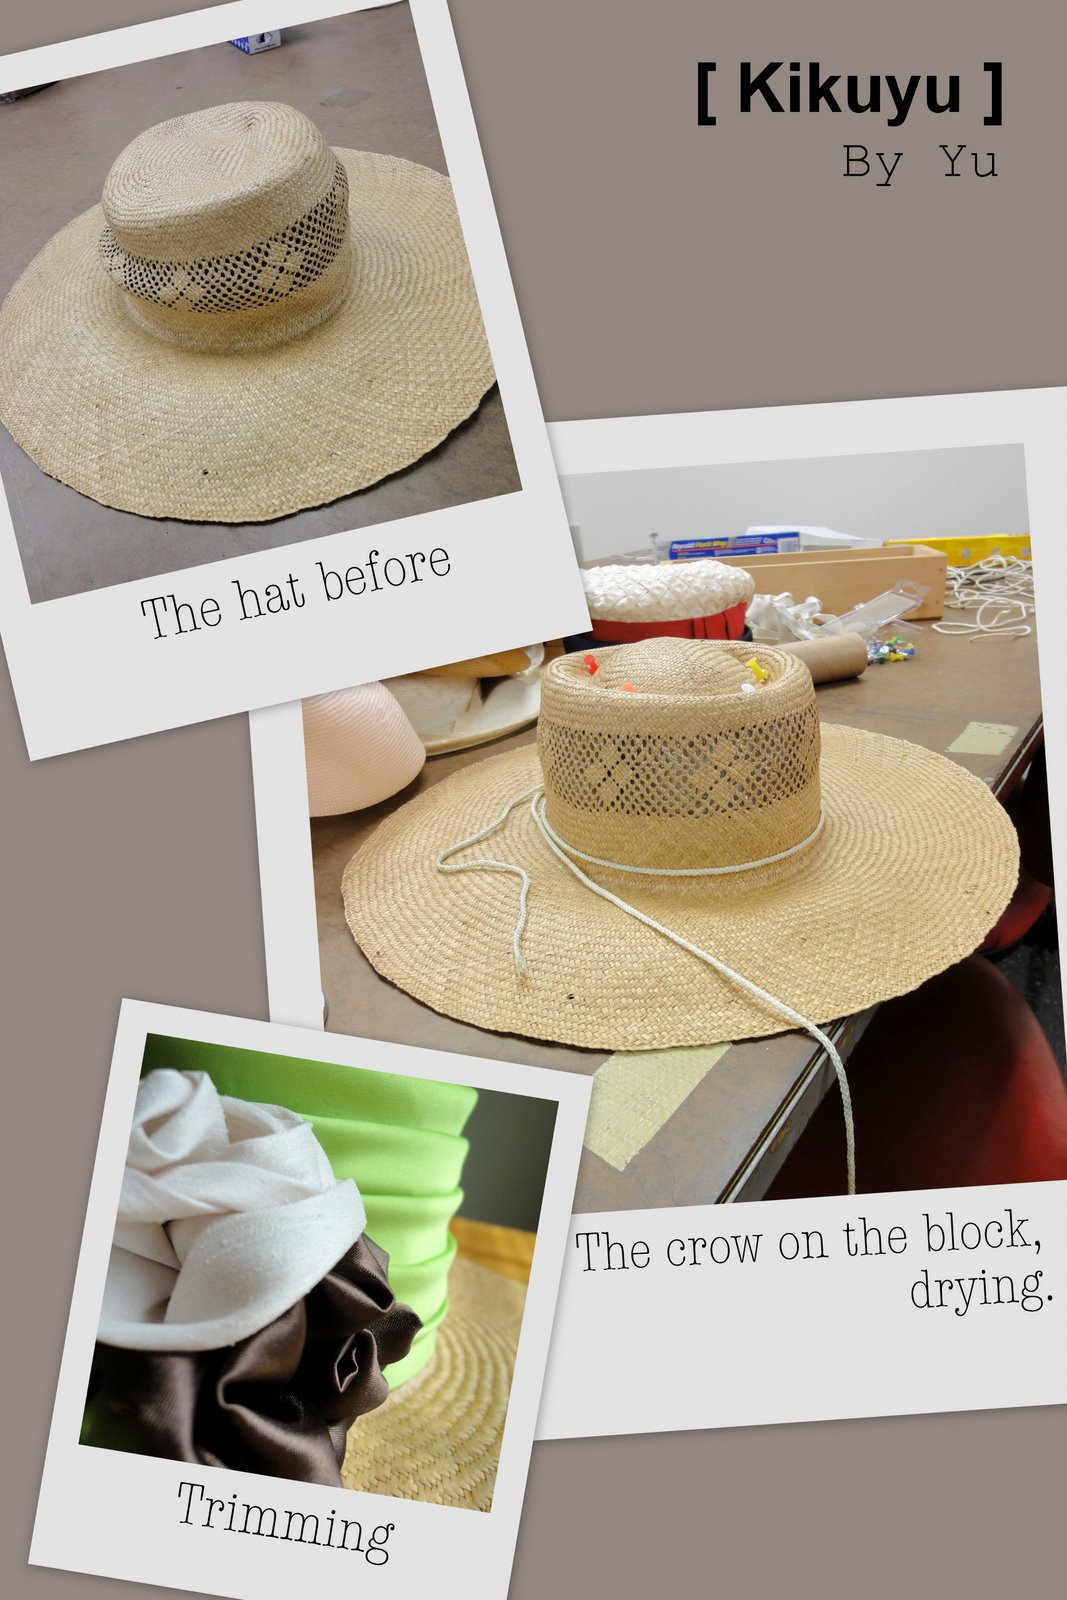
I think it was some kind of gardener hat, but didn't have any shape anymore. I first wanted to make a cowboy hat out of it: it was rodeo time, here in Houston. But after blocking it, I realized it was kinda awful.

So I blocked it again, and made a more formal hat. The formal look is due to the shape of the wood block and the satin trimming. This hat would be perfect for a wedding!

Even though it looks easy, I'm still amazed by the amount of time you have to work on a single hat! Just to hand sew the sweatband always take me forever!

Monday, June 20, 2011

Millinery class: Blocking a hat

I deeply loved to learn millinery. I'd love to become a milliner.
You've already seen my beret and pillbox.
For the 5 others hats I made for the class, we needed to block.
So here are all the blocks available at the college.

blocs a chapeaux
I WANT the same closet! Isn't it a dream?

I'm so in love with the large choice of blocks!
On the left closet, you can see the steam maker we used.

So here is how to block a hat:
  1. You choose the wood block you want and you cover it with some plastic wrap (to avoid any stain on your hat and any damage on the wood block)
  2. Moisten your straw/buckram/fabric/felt/hat
  3. With steam and your hands, make your material smooth on the block by using pins/strings/elastics to maintain it as you go
  4. You can add some stiffener if needed
  5. Let it dry on the block (we let them a week, until the next class)
Tadam! You blocked your hat.
You now have to sew the different part together, add a sweatband and trim it!


Here are several of my hats drying:

mes chapeaux qui sechent

You can see straw (the pinky one on the 1st pic, that's a vintage hat I still have to finish), sinamay (brown, black and white - I'll do the brown... later!) and fabric + buckram (1st pic, to make cocktail hats) .

I need blocks at home to continue making hats!!!

Friday, June 17, 2011

I want that look!!!!

Ok, so for once I'm not gonna speak about sewing.
I just want to show you an outfit I've been dreaming of lately.


I love this blazer and the skirt is awesome. I have to think about making/buying a blazer for this summer to beat the A/C.
And gray..... that's my fav' color!

Ok, ok, for the people who know me, that's not really the kind of stuff I'm wearing. But I could change, right?

Wednesday, June 15, 2011

Millinery class: Pillbox hat

After my béret, here is the second hat I did for the millinery class.
It's a pillbox hat.

pillbox millinery

The fabric is shinny, so It's not easy to get the real color on picture. I guess the picture below is somehow closer to the real fabric, but een for the eye, this fabric looks more or less dark. But I love it (I'd like to make a bustier out of that!)

Millinery pillbox hat

Here are the steps to make it. You can see the inside Buckram and the metal wire I sew inside (3 wires in all).

pillbox details

The hat looks even better on me. With that on, I'm as glamour as Jacky Kennedy with her pillbox! I have to find a dress to go with, though...

Monday, June 13, 2011

Millinery class: my beret

During the spring semester, I took not only a sewing class at the community college, but also a millinery one. I really enjoyed this class.
I've always loved trying on hats, even though I'm too shy to actually wear them.

I made 7 hats there and I'm gonna present you all of them.
So let's start today with the first one we made: a shirred beret.

Millinery beret

I cut this dress to make the beret.
I lined it and put some Buckram to make the band around the head stiff enough. I sewed in a sweatband. For the bow I used lace and satin.

Even though I wasn't really thrilled by the idea of sewing a beret (not really what I expected from a millinery class and... being french, that's too much of a cliché!), I like the outcome.

Unfortunately this shape doesn't do me any favor...
On the other hand, it looks really cut on one of my friend. So now it's hers!

Saturday, June 11, 2011

My first sewing class

I went back to school during the spring semester to follow a Ready-to-Wear Construction class at the community college (I will never thanks enough the US for that!).

During this class, we had to make 3 garments with a given pattern, size 8. We were only free to choose the fabric, as long as it was a natural fiber (and we all went for cotton as it's the cheap for training) and it had no line or motifs we had to match.
That's not much of a freedom, but hey, that's the beginner class!

See how awesome is the classroom:

Sewing Classroom

We first had to train for using the industrial sewing machines (at first, that's just SO fast): being able to find the right speed, following lines and curves, threading them properly and so on


We were ready to start our first garment: a straight skirt.
We all learned plenty of stuff and among them how to use a serger, to do darts and to insert properly a zipper. I was so proud of me!

Black skirt class
Yeah, I should have iron it before taking pictures, but I was lazy this day...


The second garment was a Dolman jacket.
I think this pattern is somehow crapy as there are plenty of pleats around the sleeves. But still, I learned how to do the collar.

Dolman Jacket Class


The third garment was a dress.
I had a hard time with this zipper (inserted differently than the skirt one) and the sleeves. I was really surprised that you actually have to gather the sleeves to have non-gathered ones!

Dress Class

Grazie mille Vale for being my model during the photo shoot!
It was really fun...

Wednesday, June 1, 2011

Japanese top

A friend of mine challenged me.
We both had to sew our own top with the pattern 5 from the Japanese book:

"Otona No Couture One Piece Smoke Blouse"
(ISBN : 9784579111497)

I choose an American-inspired cotton voile from JoAnn:

Defi JCA Livre 5


So here it is:

JCA livre 5

I made quite a lot of changes. I didn't wanted it to make me look pregnant, so I had to remove fabric from the "skirt" part. As I wanted it prettily fitted, I added an elastic on the back. I also made it sleeveless and added some gathers, so the neckline is now different from the pattern.

Otona Blouse

Sneak pics on the details:

JCA details

Even though I loved the fabric when I bought it, I later though it was too much of a busy print for me to like wearing it. But I finally like it, and was wearing it on Memorial Day...

Oh, and for the challenge I needed an accessory. Here is the headband I made:

JCA Accessoire