Wednesday, October 31, 2012

Summer dress

Last spring I took a class to learn how to make custom made patterns. The final project was to sew anything we wanted for ourseleves.
Summer was already there and I was super busy with my 2 wedding dresses, I decided to go for a super simple cotton knit summer dress. And yes, that's kind of cheating since knitwear don't need to be custom fitted. But really, at that point, that's all I could reslove myself to do.
And here, I'm wearing it in the warmest day of summer (it was 40celsius, so above 100F!) to try a real Texas bbq before going tubing at the river:
NB: I'm not so fond of the hat, but it protect me against the sun quite well, and cover my face for the pictures I post here!

On the next picture, you can see how we do custom patterns: we create a copy of ourselves that can then be used as a dress form for draping.
To do it, we took our measurements, then picked the regular pattern size closest to our size, and finally draped it on ourselves (we were in teams) to make it fit perfectly, with no ease. This was quite long to perfectly achieve but we did it! And I was lucky to work with 2 really talented friends on that one. So once this is done, you sew it in a sturdier fabric (duck cloth) and fill it with bating so it fits on an existing dress form. And you're ready to use it as your new dress form!

I must say that it's quite weird to have a mini-me.
It was also quite long to do, but it was our 1st time. So it should become faster and faster as we get used to it.
And it's so useful!
Happy halloween!

Monday, September 10, 2012

Mod Wedding Dress

I also did this wedding dress for a contest and I think that's my best piece so far. I love everything about it: it's simplicity, elegance, the concept behind and the craftsmanship on it.
If the shape clearly remind of the mod/60's, the transparency give it a modern edge.

my dream photo shoot

The picture above is my dream photo shoot. I just childishly played with the picture from the school end of the year fashion show on Photoshop (ok, I must admit it's not Photoshop but Gimp... it's freeware little brother). This was my first try at altering a picture so please be kind.
And for the photoshoot to be perfect, I would love some of those white lines to come in front of the model, and maybe have one in sone kind of plastic to be crushed by the model hands in front of her face. But ok, let's stop dreaming and just go back to the dress.

You can see it on the catwalk of the contest I made it for:


If I didn't win anything, I was so pleased to see both of my wedding dresses opening the show. That was a sight I won't forget.

Opening of the show!

Do you recognize my other wedding dress? If not, you can see it here.

Let's now talk a bit about the concept and construction.
This dress was actually my first take at my "point of view" concept. That exact same concept I'm now working on full time to do my first collection.
I wanted the lines to be absolutely parallels and equal in width.  By absolutely I mean that I wanted them to be seen that way from the unreachable but so widely acknowledged infinity point. I feel I might have lost you right here. So a more simple way of seeing it would be to say that I wanted this dress to prefectly disapeare behind some parallels white line like the one in the first picture.

But where it becomes tricky is that the body has curves. Therefore, to look parallel and the same size, the stripes have to NOT be the same size and parallel.
To achieve that effect, I had to mark my lines directly on the final shape. I did a "muslin" (I used paper on the skirt part for the stiffness and to cut some steps) and then used a laser pen parallel to the floor to mark the lines:


I know it doesn't look much like sewing and people at school were just stoping by looking at me with the "what the heck is she doing" kind of look.

This is the first time I'm fully happy with something I made.  And that's because the craftsmanship on that one is really good. I've never sewed so nicely. This dress is actually more of couture garment when it comes to the finishing: self-lined white bands with a lot  of hand sewing, french seams, covered bones on the sides.


And I even got the Best of Show Award at school for it. Isn't that amazing?
Well, I think you got it: I love it!

Could you imagine yourself wearing it? For your wedding or a fancy event? Daytime or night time?
To what event can you imagine yourself wearing it?

Have a wonderful Monday.

Sunday, September 9, 2012

New school year = New title design

With the school year starting, I want some changes here. So today, I designed a new title banner. I know it's a small change, but it make it more personal... and more appropriate. I loved the previous picture:


But birch bark was probably not the most appropriate picture for a sewing blog. The new one is a detail of one of the garment I made:


Do you remember my up-cycled dress made last year? The banner is a close up of the plastic bolero:

upcycled fashion 

I also want to express a special thank to my 10 followers and all the people reading me.

Have a wonderful Sunday afternoon!

Monday, September 3, 2012

Wet felting to make hats

Making felt hats it THE reason that made me take the millinery class again.

Wet felting is a long and tiring process but, in my opinion, the wonderful feeling of the wool and to see it change under your eyes to become a fabric make it worse it.
To give you an idea of the work required to make felt I took some pictures during the process of my 1st attemp at making wool.
Here are the main supplies I used:


You can see the grey merino wool in the middle. Merino is know to be the easiest to felt. Since is was already quite long and tiring (in a work-out way), I must admit being shy over try other fibers.
You can see here some of the work involve in felt-making:


The pictures are mostly from the beginning of the process as I was way to busy during the rolling/throwing parts to even think about taking pictures! And yes, the second pair of hands are my teachers'.

At first, I did block this hat to be a cloche. But I later changed it for what you can see in this picture:


Yes, I speaking about the light grey hat at in the back. This is the only picture blocked I have cause I still haven't finish it. I blocked so many hat that semester that I will most likely not be done finishing them before next summer...

I also blocked the 3 other hats in the picture, but I can not brag as much about them as I simply bought the felt instead of making it!

I have to admit I loved blocking felt even more than sinamay.

Monday, August 27, 2012

Back to school!

Today was the 1st day of class. I was really looking forward to it as I'm now officially in the Collection Class. This one year class is probably the most stressful but the most interesting one. The goal is to create a 5 looks collection within a year.

I absolutely love thinking about a collection, making cohesive looks and not just some single, independent outfits.

With my best friends at school, we started thinking/working on it over the summer break. I already have the moodboard and 50 black and white sketches due in two weeks. I'm now working on colors and fabrics and plan on making my slopers this week because I do not like the ones we're using at school.
I find the fabrics and colors choices quite hard. Probably because I'm not that good at making choices & I will order fabrics online as stores around are too expensive. Also, I have to rework the moodboard to adjust some colors and layer/mask on computer.

If I do not plan on posting a lot of pictures of my collection before presenting it next year, I can already tell you the season and title:

Point de Vue
Fall/Winter 2013

Have a nice school year!

Monday, August 20, 2012

Bad pants fundraising fashion show

Our school was contacted by the Texas Children hospital for a fundraising.
They wanted to have some students to design "bad pants" for local media personalities for a fashion show.

I was glad to be amongst the 5 students who where asked to do that (and yes, it has something to do with the fact that I spent my whole summer hanging around school). On that project, my friend at school was my partner. It was my first time working with someone on a design project and it was really interesting.
We both had to work against what we like as none of our style is funky. We usually design neutral, simple, elegant looks. But it was really good to work outside of your confort zone.
Here is what we ended-up with:

Also, one challenge for us was to meet to work on that on the only short week we had to make that happen. But as fashion designers, we're up to any challenge!
Here is our model, backstage just before the show:


And here are the other students' designs:

Can you see how everyone is having fun? Aren't the pants so bad that they're awesome?
And I must say that they are all really well made.

The event was really nice and I would do it again...

Have a nice week!

Monday, August 13, 2012

My First Wedding Dress!

Last winter, I spent a great deal of time in every single bridal store in town to help my friend find her special dress. But I must say I wasn't unhappy about that. It gave me the opportunity to spy on thousands of dresses, looking for inspirations, finishing, techniques, materials...
If you're in fashion design, you know exactly what I mean.
Anyway, I loved it and wanted to try myself to sew a wedding dress but had no reason to do so. And seriously, with the amount of work & fabric involve to make such a dress, it is pointless to make one "just for fun".

When, in the Spring semester, the teachers started encouraging us to enter a fashion design competition in Dallas, I had what I was hoping for: a good excuse to spend time and money on this kind of project! I love school!

After sketching about 10 dresses, I choose to make a simple yet elegant one which would make me work on bustiers.

Here is my dress, walking on the Dallas Career Day runway:


Isn't it super pretty? Well, I know the model is not for nothing in that, but still!
I didn't win anything at the contest, but it did not matters. My design was part of the opening looks. It was so amazing to see my dress coming out on such a professional show.
I loved loved loved it.
I loved it so much that I'm now looking for as many runway as I can get for all my designs. And I'm definitly going back next year, even if I don't enter anything in the contest. I just loved this show!


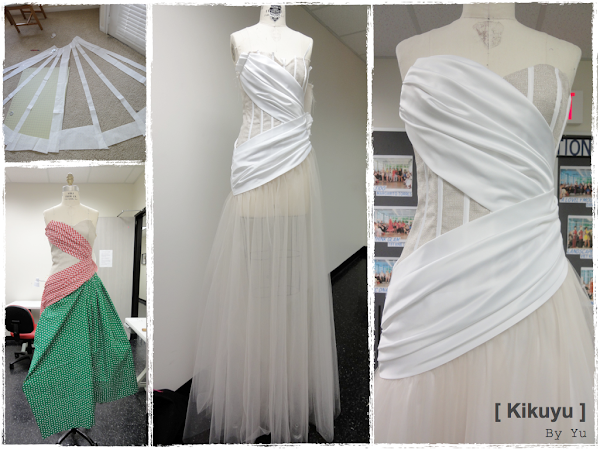
But I'm here to talk about my dress, so here are some pictures who might interest the sewer among you:


From top to bottom & left to right, you can see:
- The skirt pattern in progress
- a try out of the draped part, just for fun, with the fabrics I had on hand, on top of the just sewn bustier
- The dress, waiting to be lined
- A close-up of the finished bustier with the draped satin on top.

And because a bride as to be the prettiest under every angle, here are different views of the dress:


Here is the same dress but at the end of the year fashion show at school.
I told you I'm now showing my garment as much as possible!


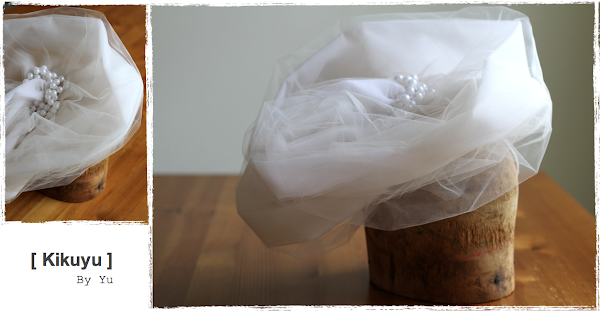
For this show, I made the head-piece during my millinery class:


I must confess that is the dress is exactly my style, I think the hat is a bit too much. Yes, I like simple things!

One last thing: I have something for see thru garments and thought for a while not lining the skirt but instead just make a matching satin short. Well, I didn't dare and just sticked with a more traditional gown. But don't you think it would have been cute?

Sunday, August 5, 2012

Millinery: Romantic headband

 For the millinery class, one of the assignments was to make a headband.

 I shaped the millinery wire into double heat shape before giving it the curve needed to fit the head.
If the head block was convenient, I liked the fact that you can do it without any wood block, as we all have a head to try it on... Which means that anyone can make this kind of hat!

After shaping the wire, I covered it with fabric for the look as much as for the comfort.
The last step was to decorate it. I made a sinamay & organza flower:

Red sinamay and organza hat

If you fell that this hat has a deja-vu feeling, it most likely means that you're one of my fellow reader. So thank you, thank you, thank you!
I made this hat to match the dress for the Strapless dress/Advanced bustier class. And it was worn by my model at the end-of-the-school-year fashion show, last Spring.
You can see it here: Strapeless Cocktail dress.
Happy Sunday!

Monday, July 30, 2012

Milinery: turban hat

One of my assignments this semester was to make a turban hat.
I know that, as soon as I said turban you had in mind this huge scarf that people complexly roll around their head in several countries. If I could have done that, I probably would have needed to stitch it in place so it does not have to be done over and over.
But in milinery a turban hat would mostly have a stiffer understructure to easily keep it's shape.
That's this kind of turban hat that I did.


I blocked the base in buckram and then covered it with the draped fashion fabric. Then I did as few hand stitches as possible in oder to keep the fabric in place without making it look stiff. Because the whole beauty of a turban hat come from the apparent simplicity of the drape and the "I'll stay in place magically" effect.

To be totally honest, I have to tell you that I first draped a squre of fabric on the top of the hat and then added some batting around the outside to give more volume. This was finally covered by a long bias strip of fabric.

And as usual, I added the lining and the sweatband. For the lining, I used a comfy cotton knit.

My original plan was to add some kind of bow in the back/side where the top creases meet. But I gave up on that as I realized I loved it simple, just worn tilted on the head.

I know that those pictures does not do it justice, but that's all I've got for now. Maybe some days I'll have pictures of the hats worn... who knows.

Happy Monday!

Monday, July 23, 2012

White sinamay summer hat

Since my millinery class, last spring, I have been willing to make hats. But I do not own any blocks and those are expensive. Plus, I wanted to learn how to make felt and block it.
Those were excuses good enough for me to take the class again.

Therefore, I was again in milinery this spring. My assignments weren't the same than the beginners'. But I really wanted to block sinamay again. So that was my 1st project:


I still had some off-white sinamay leftover but had to reorder some. After blocking 3 flat brims the last time, I picked another shape this time.
Also, I had mainly been working with neutral colors (balck, white and brown) and wanted some colors. That's how I decided to go for pink and orange. I love those colors together. Their are refreshing and definitely call for the sun.

This hat could be worn for the royal ascot as well as any ceremony. It makes me want to have a 5pm english tea:


Here are some close-up on the trimming:


I making hats again and I really enjoy it. I can't wait to post here everything I've done this spring semester... and I'm still finishing!

Have a nice week and see you next Monday.

Monday, July 16, 2012

Sketching class

While posting my work from the fall semester, I forgot to show you what I did for my sketching class.
To start with, I'd like to really thank my teacher and friend for teaching me how to sketch. Seeing where I started, it was a challenge. I wasn't able to draw anything and now I can sketch the fashion figure and dress it. Isn't that awesome. It might well be the class were I learned the most.

I want to show you the final project, but before let's explain it.
The goal was to create a small collection, starting with 3 inspirations. We had to do 4 full figure sketches plus 1 close up of either a face or shoe. They had to be presented on 4 boards with pictures of the inspirations and fabric swatches.
For the inspirations, we had to choose 2, and we had to pick the 3rd one in a bag.

I decided to go with something I love most in the whole world: the white, snowy mountains. I could stay hours in awe, looking at such a landscape, and here in Texas, I just miss it too much. So here was my main inspiration.
Also, because I don't like when thing are to obvious, I decided to do a Spring collection (I know what you're thinking right now...but I assure you I'm not crazy, I just love challenges).
And from my inspiration I got 2 themes:
- the first one is the apparent calm, softness you can see while looking at such a landscape
- the second is the strength, level of preparation and awareness you need to reach if you want to face such a climate
I do love this contrast.
For the 3rd inspiration I was lucky to pick the Menil collection. If you're not from Houston, you most likely haven't heard of it. But if you love art, you probably should plan a trip there as this private collection is one of the most amazing. The art pieces you can find are as fantastic as the architecture of the buildings, which is what i used as inspiration, along with some installations.

Here is my final project:


Being a collection the sketches and boards had to be cohesive.  I thought it was fun to use 2 of the Menil art pieces to link each board as a story, staring really stiff, with angles to evolve slowly to a soft silhouette.

And because you most likely can't see much my sketches on this big picture, here is what I did with them while playing with Gimp:


It was my first time designing a collection. What do you think of it?

And just for the fun, here is one of the sketch I did. This homework was to draw in 8 minutes a live model (Thank you Vale!) in a continuous line and then shade it. I like it a lot, though I'm not sure why. The bottom of the jean probably.

Monday, July 9, 2012

Strapless cocktail dress

During the spring semester I took a class called Advanced Bustier-Strapless Dress. The goal was to learn how to make a lightweight bustier (corselette) and attach a dress over it.
The purpose of the hidden bustier is to keep the dress where it should be, instead of having to readjust it to avoid any boob-showing issue (I'm looking for a more appropriate way of saying that, but can't figure anything) and you don't have to shop for a special bra either!
You would find that in any couture dress and maybe high end garments.

I kind of twisted the assignment when I decided to actually show this bustier. You know, the way Jean-Paul Gauthier does...
Plus the bustier itself is really pretty and take quite some time to make (at least the 1st one!)


I made a headpiece to go with it for my school Spring show.  Can you see the heart shaped headband, bringing romantic touch?
Isn't my model super cute? Thank you J. for always helping me to find models!

Spring fashion show

I'm just annoyed with myself that I realize only now that the right part of the skirt it obviously tucked in some ways in the bustier. I should have pull it before she walk! For my defense, backstage was a real crazy house.

And yes, this dress, but the bra cups, is made only of sheer fabrics. The layering makes it almost not see thru anymore. But to be on the safe side and stay far from the slutty effect, I did sew a boyshort in the cotton/spandex knit I used for this gown. I'm not sure it would have been needed for a Couture show, but this was just at school!

organza butterflies

Let me add another romantic touch.
The burgundy organza butterflies are the one I used to decorate for my wedding.
This winter, I was cleaning up the box full of treasures from my wedding when I found those butterflies. I just figure that instead of letting them end in a box, they were better in the spotlight once more. So my newly design and sewing skills where just the perfect way of using them. Therefore, they were the first and main inspiration for this cocktail dress.
Isn't it a nice second life forthem?

I'll be curious to know for which event could you see yourself/others wear this cocktail dress?
See you next Monday!

Monday, July 2, 2012

Red knitwear evening gown

The final project for my knitwear class was to drape and sew a dress. Draping knitwear was a bit challenging but it's also forgiving.And the sewing and finishes are soo fast! In knits, you can make a garment in no time.
I did enjoy the freedom for this project. We knew about it since the beginning of the semester, so I had enough time to find this gorgeous red cotton spandex blend.

I wanted the dress to be elegant, and I'm fond of low back. Since this fabric would have been to heavy to drape a nice cowl, I did a more simple low back. I added the straps to make it more interesting.
I wanted to keep it simple so the front and skirt parts are just plain fabric. The top part is self-lined so the dress can be worn without a bra.
low back and straps

I love the final result. I think it's just what I wanted. It's also really simple... so me!
I'd love to be able to wear it!
Do you like it too?

Monday, June 25, 2012

Peplum Jacket & Pants

For the same class, we had to sew fully lined pants.
I used a fabric bought at the school fabric sale. The multicolor print reminded me of a Chanel fabric. It was given by a handbag designer and is backed with a very heavy and stiff black cotton. Nevertheless, I thought the print was really interesting for pants.
To break this busy print, I decided to put 4 black & gold metal zipper in the front. I love how it makes these pants look modern.
Since the last project for this class was to make a peplum jacket, I just went ahead and used the same fabric, so I could have a coordinate business attire.
Here how it all turned out.


I know peplum are right in trend, but I still see then as kind of old fashion. So I wanted to add a twist to it. I played with the sleeves to achieve this more modern and edgy look. I designed cap sleeves which I sew into the princess lines of the sleeveless jacket. I love how it turned out.
Here some close-up and a pic of the back:

I'm truly happy with the final look, even though this fabric is definitely too stiff ans yes, I'm still not fully happy with my finishing...


Here is my design worn by Tiffany for the school Christmas fashion show:


Isn't she super elegante with this black turtleneck underneath?
Oh yeah, and on this last pic, the sleeves are not finished: the armhole needed to be cut and the bias tape applyed. So it's kind of too small and give this bulky look next to the armholes...

Anyway, I was so excited to get to see my clothes worn! It so worth all the work you put in them!

Monday, June 18, 2012

Bias Dress

For my past Fall Design Construction class, we had to do a bias top. The teacher gave us as usual a pattern and we had to alter it. I was not really in love with the top so I decided to go for a full length dress. I changed the top pattern so much using patternmaking and draping techniques, it would have been way faster to just drape it all from scratch.

Bias Dress

The fabric is not my favorite as it has too much colors for my taste. I usually love plain colors or neutral prints. And this one is far from both.
 Well, I got this fabric for really cheap at the school fabric sale. I actually bought it to use as a muslin to drape (its hand would be perfect to use as muslin for silk charmeuse). But I had quite a lot of it and figures it was the best fabric I already had at home for a bias top/dress. Cause I have to start using all the fabrics I have at home, instead of going buy new stuff for each and every project.

I'm fond of lines and plaids and I love color touches for summer outfits! The fabric itself inspired me for the back.I'm quite happy with the final result. I think it's a really interesting dress and the simplicity of the cut enhance the busy print.
On the picture, I just knotted the 4 straps on the back, but I'd love this dress to be a summery one and I need to find a nice coconut closure - the type used for pareo -
I imagine this one for a long walk on the beach at sunset, just before a romantic dinner.

Monday, January 30, 2012

Upcycled Fashion: Flash & Trash Fashion Show

At school, we have a show called "Flash & Trash" during the fall semester.
The goal is to use unconventional materials to make clothes. For me, the whole goal of this was to reuse material, to up-cycle them.
I went for one of the most obvious one. The shopping bags. I don't know how people do in other states, but here in Texas, they still give us plastic or paper bags when we go grocery shopping. Coming from France where they stopped doing so to lower the amount of trash, I usually either bring mines or reuse them as trash bags. But I always have plenty of them.
So it fits perfectly with my vision of this show.
Here is the dress I made:

upcycled fashion

All the white are plastic bags, while the purple are dyed paper bags. I also used cardboards from cereals boxes to make the under-structure (petticoat and boning) as well as muslin for the lining of the bustier. Actually, even the muslin is recycled as those are pieces of gingham previously used for draping.
For the techniques used, I waived plastic bags, hand and machine sewed and stapled (petticoat).

And I love the final result.
The model is my friend Faye. She was really gorgeous and awesome.
Faye, thank you sooo much!


paper and plastic bags dress

Well, if I could change something, I would remove the bows on the skirt. I added them at the last minute 'cause I was afraid it would not be "enough" for this show. But I'm not fond of them.
On the other hand, I love the bolero and the purse!

A tiny mosaic of all the looks for the show:

recycling

Let's finish with some pictures of the steps.
Here is the drying of the dyed papers, as well as the bustier and its lining:

paper bustier

And there, the waiving of the plastic bags for the hand bag. It was fun but soooo long to do.
Only the hand sewing of everyplastic square of the bolero was as long as the waiving. I'm glad I could do both watching TV!
But hey, they both really worth it!

Waiving plastic bags

Monday, January 16, 2012

Capri pants & Bolero jacket

For the class I love to call "sewing 2", after the shorts we had to make capri pants.
I decided to use a plaid fabric I bought at the school fabric sale.
Since I didn't like the cut of the previously made short (it was ridiculously big for a size 8 and the waist was sooo high!), I changed this one. I lowered the waist under the natural waist, made it smaller and adjusted it for me.


Capri Pants

It fits me perfectly. I'm so proud for that! It wasn't that easy and matching the plaid at the same time was kind of a pain in the a**. Well, that was the 1st time, so I guess I had to expect it, but I love challenges!
I love it and my colleagues even told me it looks like a Vivienne Westwood piece (yeah, plaid....)

The bolero jacket was for the same class. It's fully lined. I used a linen I dyed - yes, again trying to dye in black and I'm getting better!

Bolero jacket

It doesn't look bad with the capri pants, but it's boring. I'm not sure I'm ever gonna wear that... and my friends know I love boring clothes!

Friday, January 13, 2012

Turtleneck

After the legging, we had to make a turtleneck. The teacher gave us a pattern but we had to change the neck. So here is what I did:

turtleneck sweater

The fabric is the same I used for the legging.

Turtleneck

It's a really nice sweater to stay comfy at home or, assorted with the legging, to go to the gym.
I love how simple it is and all the possible changes I could make for the next ones: silhouette, neckline, pockets...
I still have plenty of this fabric (about 6 yards I think... or maybe 10!) so I will have to do some more and try to dye it again!

Thursday, January 12, 2012

Legging: my 1st time with knits

This legging was the first project for the knitwear class. The goal was to start threading and using a serger (a merrow machine, if you will), play with elastic and elastic thread and see which stiches were working on the sewing machine for knits.

legging

The fabric was initially the light blue of the side tuxedo stripe. But I wanted black! So I unsuccessfully dyed it. I'm still not good with the amount of dye I need to use, as you can see it's not even a navy blue! But well, I like the color and both blues look great together IMO.
I'm gonna wear this legging for yoga!