Showing posts with label Dresses. Show all posts

Wednesday, October 31, 2012

Summer dress

Last spring I took a class to learn how to make custom made patterns. The final project was to sew anything we wanted for ourseleves.
Summer was already there and I was super busy with my 2 wedding dresses, I decided to go for a super simple cotton knit summer dress. And yes, that's kind of cheating since knitwear don't need to be custom fitted. But really, at that point, that's all I could reslove myself to do.
And here, I'm wearing it in the warmest day of summer (it was 40celsius, so above 100F!) to try a real Texas bbq before going tubing at the river:
NB: I'm not so fond of the hat, but it protect me against the sun quite well, and cover my face for the pictures I post here!

On the next picture, you can see how we do custom patterns: we create a copy of ourselves that can then be used as a dress form for draping.
To do it, we took our measurements, then picked the regular pattern size closest to our size, and finally draped it on ourselves (we were in teams) to make it fit perfectly, with no ease. This was quite long to perfectly achieve but we did it! And I was lucky to work with 2 really talented friends on that one. So once this is done, you sew it in a sturdier fabric (duck cloth) and fill it with bating so it fits on an existing dress form. And you're ready to use it as your new dress form!

I must say that it's quite weird to have a mini-me.
It was also quite long to do, but it was our 1st time. So it should become faster and faster as we get used to it.
And it's so useful!
Happy halloween!

Monday, September 10, 2012

Mod Wedding Dress

I also did this wedding dress for a contest and I think that's my best piece so far. I love everything about it: it's simplicity, elegance, the concept behind and the craftsmanship on it.
If the shape clearly remind of the mod/60's, the transparency give it a modern edge.

my dream photo shoot

The picture above is my dream photo shoot. I just childishly played with the picture from the school end of the year fashion show on Photoshop (ok, I must admit it's not Photoshop but Gimp... it's freeware little brother). This was my first try at altering a picture so please be kind.
And for the photoshoot to be perfect, I would love some of those white lines to come in front of the model, and maybe have one in sone kind of plastic to be crushed by the model hands in front of her face. But ok, let's stop dreaming and just go back to the dress.

You can see it on the catwalk of the contest I made it for:


If I didn't win anything, I was so pleased to see both of my wedding dresses opening the show. That was a sight I won't forget.

Opening of the show!

Do you recognize my other wedding dress? If not, you can see it here.

Let's now talk a bit about the concept and construction.
This dress was actually my first take at my "point of view" concept. That exact same concept I'm now working on full time to do my first collection.
I wanted the lines to be absolutely parallels and equal in width.  By absolutely I mean that I wanted them to be seen that way from the unreachable but so widely acknowledged infinity point. I feel I might have lost you right here. So a more simple way of seeing it would be to say that I wanted this dress to prefectly disapeare behind some parallels white line like the one in the first picture.

But where it becomes tricky is that the body has curves. Therefore, to look parallel and the same size, the stripes have to NOT be the same size and parallel.
To achieve that effect, I had to mark my lines directly on the final shape. I did a "muslin" (I used paper on the skirt part for the stiffness and to cut some steps) and then used a laser pen parallel to the floor to mark the lines:


I know it doesn't look much like sewing and people at school were just stoping by looking at me with the "what the heck is she doing" kind of look.

This is the first time I'm fully happy with something I made.  And that's because the craftsmanship on that one is really good. I've never sewed so nicely. This dress is actually more of couture garment when it comes to the finishing: self-lined white bands with a lot  of hand sewing, french seams, covered bones on the sides.


And I even got the Best of Show Award at school for it. Isn't that amazing?
Well, I think you got it: I love it!

Could you imagine yourself wearing it? For your wedding or a fancy event? Daytime or night time?
To what event can you imagine yourself wearing it?

Have a wonderful Monday.

Monday, August 13, 2012

My First Wedding Dress!

Last winter, I spent a great deal of time in every single bridal store in town to help my friend find her special dress. But I must say I wasn't unhappy about that. It gave me the opportunity to spy on thousands of dresses, looking for inspirations, finishing, techniques, materials...
If you're in fashion design, you know exactly what I mean.
Anyway, I loved it and wanted to try myself to sew a wedding dress but had no reason to do so. And seriously, with the amount of work & fabric involve to make such a dress, it is pointless to make one "just for fun".

When, in the Spring semester, the teachers started encouraging us to enter a fashion design competition in Dallas, I had what I was hoping for: a good excuse to spend time and money on this kind of project! I love school!

After sketching about 10 dresses, I choose to make a simple yet elegant one which would make me work on bustiers.

Here is my dress, walking on the Dallas Career Day runway:


Isn't it super pretty? Well, I know the model is not for nothing in that, but still!
I didn't win anything at the contest, but it did not matters. My design was part of the opening looks. It was so amazing to see my dress coming out on such a professional show.
I loved loved loved it.
I loved it so much that I'm now looking for as many runway as I can get for all my designs. And I'm definitly going back next year, even if I don't enter anything in the contest. I just loved this show!


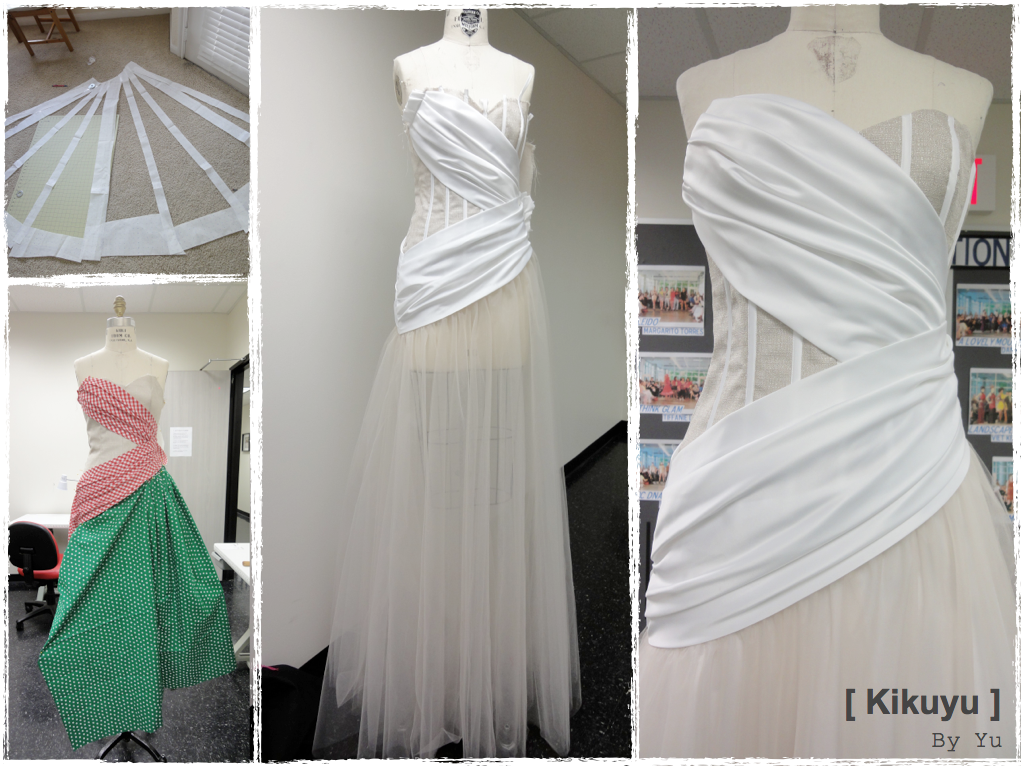
But I'm here to talk about my dress, so here are some pictures who might interest the sewer among you:


From top to bottom & left to right, you can see:
- The skirt pattern in progress
- a try out of the draped part, just for fun, with the fabrics I had on hand, on top of the just sewn bustier
- The dress, waiting to be lined
- A close-up of the finished bustier with the draped satin on top.

And because a bride as to be the prettiest under every angle, here are different views of the dress:


Here is the same dress but at the end of the year fashion show at school.
I told you I'm now showing my garment as much as possible!


For this show, I made the head-piece during my millinery class:


I must confess that is the dress is exactly my style, I think the hat is a bit too much. Yes, I like simple things!

One last thing: I have something for see thru garments and thought for a while not lining the skirt but instead just make a matching satin short. Well, I didn't dare and just sticked with a more traditional gown. But don't you think it would have been cute?

Monday, July 9, 2012

Strapless cocktail dress

During the spring semester I took a class called Advanced Bustier-Strapless Dress. The goal was to learn how to make a lightweight bustier (corselette) and attach a dress over it.
The purpose of the hidden bustier is to keep the dress where it should be, instead of having to readjust it to avoid any boob-showing issue (I'm looking for a more appropriate way of saying that, but can't figure anything) and you don't have to shop for a special bra either!
You would find that in any couture dress and maybe high end garments.

I kind of twisted the assignment when I decided to actually show this bustier. You know, the way Jean-Paul Gauthier does...
Plus the bustier itself is really pretty and take quite some time to make (at least the 1st one!)


I made a headpiece to go with it for my school Spring show.  Can you see the heart shaped headband, bringing romantic touch?
Isn't my model super cute? Thank you J. for always helping me to find models!

Spring fashion show

I'm just annoyed with myself that I realize only now that the right part of the skirt it obviously tucked in some ways in the bustier. I should have pull it before she walk! For my defense, backstage was a real crazy house.

And yes, this dress, but the bra cups, is made only of sheer fabrics. The layering makes it almost not see thru anymore. But to be on the safe side and stay far from the slutty effect, I did sew a boyshort in the cotton/spandex knit I used for this gown. I'm not sure it would have been needed for a Couture show, but this was just at school!

organza butterflies

Let me add another romantic touch.
The burgundy organza butterflies are the one I used to decorate for my wedding.
This winter, I was cleaning up the box full of treasures from my wedding when I found those butterflies. I just figure that instead of letting them end in a box, they were better in the spotlight once more. So my newly design and sewing skills where just the perfect way of using them. Therefore, they were the first and main inspiration for this cocktail dress.
Isn't it a nice second life forthem?

I'll be curious to know for which event could you see yourself/others wear this cocktail dress?
See you next Monday!

Monday, July 2, 2012

Red knitwear evening gown

The final project for my knitwear class was to drape and sew a dress. Draping knitwear was a bit challenging but it's also forgiving.And the sewing and finishes are soo fast! In knits, you can make a garment in no time.
I did enjoy the freedom for this project. We knew about it since the beginning of the semester, so I had enough time to find this gorgeous red cotton spandex blend.

I wanted the dress to be elegant, and I'm fond of low back. Since this fabric would have been to heavy to drape a nice cowl, I did a more simple low back. I added the straps to make it more interesting.
I wanted to keep it simple so the front and skirt parts are just plain fabric. The top part is self-lined so the dress can be worn without a bra.
low back and straps

I love the final result. I think it's just what I wanted. It's also really simple... so me!
I'd love to be able to wear it!
Do you like it too?

Monday, June 18, 2012

Bias Dress

For my past Fall Design Construction class, we had to do a bias top. The teacher gave us as usual a pattern and we had to alter it. I was not really in love with the top so I decided to go for a full length dress. I changed the top pattern so much using patternmaking and draping techniques, it would have been way faster to just drape it all from scratch.

Bias Dress

The fabric is not my favorite as it has too much colors for my taste. I usually love plain colors or neutral prints. And this one is far from both.
 Well, I got this fabric for really cheap at the school fabric sale. I actually bought it to use as a muslin to drape (its hand would be perfect to use as muslin for silk charmeuse). But I had quite a lot of it and figures it was the best fabric I already had at home for a bias top/dress. Cause I have to start using all the fabrics I have at home, instead of going buy new stuff for each and every project.

I'm fond of lines and plaids and I love color touches for summer outfits! The fabric itself inspired me for the back.I'm quite happy with the final result. I think it's a really interesting dress and the simplicity of the cut enhance the busy print.
On the picture, I just knotted the 4 straps on the back, but I'd love this dress to be a summery one and I need to find a nice coconut closure - the type used for pareo -
I imagine this one for a long walk on the beach at sunset, just before a romantic dinner.

Monday, January 30, 2012

Upcycled Fashion: Flash & Trash Fashion Show

At school, we have a show called "Flash & Trash" during the fall semester.
The goal is to use unconventional materials to make clothes. For me, the whole goal of this was to reuse material, to up-cycle them.
I went for one of the most obvious one. The shopping bags. I don't know how people do in other states, but here in Texas, they still give us plastic or paper bags when we go grocery shopping. Coming from France where they stopped doing so to lower the amount of trash, I usually either bring mines or reuse them as trash bags. But I always have plenty of them.
So it fits perfectly with my vision of this show.
Here is the dress I made:

upcycled fashion

All the white are plastic bags, while the purple are dyed paper bags. I also used cardboards from cereals boxes to make the under-structure (petticoat and boning) as well as muslin for the lining of the bustier. Actually, even the muslin is recycled as those are pieces of gingham previously used for draping.
For the techniques used, I waived plastic bags, hand and machine sewed and stapled (petticoat).

And I love the final result.
The model is my friend Faye. She was really gorgeous and awesome.
Faye, thank you sooo much!


paper and plastic bags dress

Well, if I could change something, I would remove the bows on the skirt. I added them at the last minute 'cause I was afraid it would not be "enough" for this show. But I'm not fond of them.
On the other hand, I love the bolero and the purse!

A tiny mosaic of all the looks for the show:

recycling

Let's finish with some pictures of the steps.
Here is the drying of the dyed papers, as well as the bustier and its lining:

paper bustier

And there, the waiving of the plastic bags for the hand bag. It was fun but soooo long to do.
Only the hand sewing of everyplastic square of the bolero was as long as the waiving. I'm glad I could do both watching TV!
But hey, they both really worth it!

Waiving plastic bags

Saturday, October 15, 2011

Upcycling Fashion Show: my paper dress & plastic jacket

In about 2 weeks, my school will hold a runway show/contest about upcycling called "Flash & Trash". I am right now working on my look for the event.

But last month, I got the opportunity to present for a runway an upcycling look I made especially for the First Lady Eco Bash fashion show. It was such a great opportunity to present for the 1st time something on a show! I also helped backstage as a dresser. That was crazy but we had so much fun!

So here is the look I created:

Upcycling fashion dress & jacket

Isn't she cute?
Everything is made out of grocery bags: the dress from dyed paper bags and the jacket from ironed plastic ones.

I think this look is quite simple, mainly if you compare it to the others. But I like it nevertheless. It's so me!
Well, I have to admit that I had plan something a bit more dramatic for once, with a belt and headpiece. But we were in such a rush backstage that my model had to walk out before I got her fully ready. If I was deceived at first, I'm finally happy it happened as I prefer it this way!
Plus, I got the chance to add what was missing for the finale, so here is a sneak peek of what she was supposed to look like:

Upcycling paper plastic bags

Oh, and did you notice the necklace? I love it. I made it with plastic bags and metal can tabs!!!

And cause my models wasn't alone in this show, here are some pictures of the amazing other looks:

Upcycling show

It's now time for me to go back on my Flash & trash project. See you soon!

Sunday, August 28, 2011

Draping Class, Final Project

So here is the dress I created for my finals.
I had to make a showstopping dress Leighton Meester (Blair in the Gossip Girls tv series) would wear for the MET Costume Gala 2011 in New York.
First, Thanks to our teacher for this final. It was a really nice and intersting project.
Well, for the story, the actual gala was in may and she was wearing a little black dress by Louis Vuitton!

I searched for everything she's already been wearing on red carpets and the least I can say is that she's really fashion forward. She's been wearing a whole lot of different styles. So I had to be imaginative!

After an afternoon of looking at her and her looks, I ended up with this inspiration (I don't remember what show it was!) and sketch:


I was thinking about using chiffon and leather.
But the next day, and after seeking advices from DH and one of my classmates, I knew it was way to casual for her...
I like the sketch though, so who knows, I might end up sewing that for myself one day.

I had to find another idea, looking at all the 2011 fall fashion show.
The trends I was interested in for her dress included: plunging V-neck, sheer fabrics, pleats, leather and, why not, orange!

Here are some of my sketches, mainly inspired by Vera Wang Fall 2011 Collection

Sketches for Leighton Meester

You can see the plunging V-neck is a really strong inspiration... as are the sheer fabrics!
I'm also fond of sheer maxi-dresses. I'd like to sew one for myself. I'm amazed on how my taste have changed since I entered the fashion design program and started following the couture collections and fashion magazines (Thanks Julio!)

Ok, sorry, we're not here to speak about my fashion taste.
So back to our subject, the winner was a shorter dress, as Leighton seems to be fond of them... and I didn't wanted to buy loads of fabric!

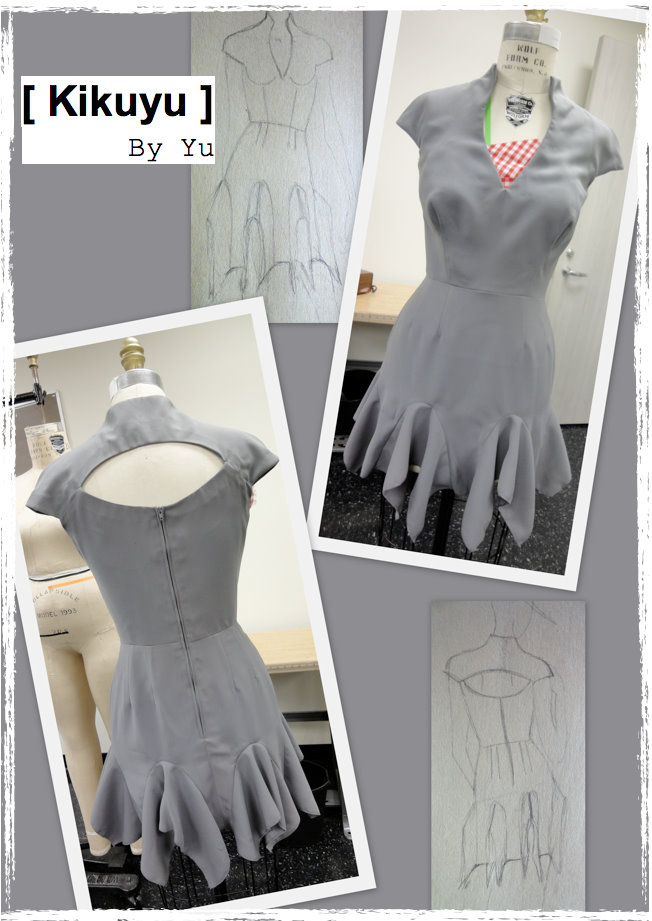
So here is what I made, out of taffeta and chiffon (you'll recognize the sketch):

Leigthon Meester dress for MET Gala - draping class

I love the back!
On the other hand, for the front I would have preferred a more dramatic top, to better match with the bottom. I should have done the lapels wider, to get a look closer to the sketch...

I'm not really happy with the finishing. I know I'm able to do something much nicer. But I did pick a dress kind of too hard for me in the amount of time I had.
I finished the dress at 8.45pm for a class finishing at 9pm! Ouf
It was kind of like in Project Runway.

My biggest regret?
I wasn't there the day of the party when everybody had to turn in the dresses. So I still haven't seen the dresses the others have done. Some where already looking awesome. Tomorrow my friend is gonna show me the pics he took. I can't wait!


Sunday, August 21, 2011

Flat Pattern 1, Final project

Finally the classes are done and I have some free time. So here is my final project.
The goal was to use a basic sloper size 8 and modify it to get the design we wanted. You can see my inspirations on the previous post.

Flat pattern final project

I'm not fond of the front look, but I think it's mainly because the mannequin has a cup size way smaller than the sloper...

Beside that, if I had to redo it I would:
- use a heavier fusible interfacing so the collar would stand better
- use a stiffer fabric, this one was really annoying to press (it was becoming clumsy as soon as it was warmed under the iron)
- I would make the set-in collar a bit higher
- I would like the back opening wider and larger, much like the sketch.

But yes, I'm not easily happy with what I'm making. The good point though is I did everything from start to finish for the first time: I started with the sketch, then making the pattern to finally sewing it.


Here are some other students dresses:

Flat pattern class other students designs

Nice, isn't it?


Saturday, June 11, 2011

My first sewing class

I went back to school during the spring semester to follow a Ready-to-Wear Construction class at the community college (I will never thanks enough the US for that!).

During this class, we had to make 3 garments with a given pattern, size 8. We were only free to choose the fabric, as long as it was a natural fiber (and we all went for cotton as it's the cheap for training) and it had no line or motifs we had to match.
That's not much of a freedom, but hey, that's the beginner class!

See how awesome is the classroom:

Sewing Classroom

We first had to train for using the industrial sewing machines (at first, that's just SO fast): being able to find the right speed, following lines and curves, threading them properly and so on


We were ready to start our first garment: a straight skirt.
We all learned plenty of stuff and among them how to use a serger, to do darts and to insert properly a zipper. I was so proud of me!

Black skirt class
Yeah, I should have iron it before taking pictures, but I was lazy this day...


The second garment was a Dolman jacket.
I think this pattern is somehow crapy as there are plenty of pleats around the sleeves. But still, I learned how to do the collar.

Dolman Jacket Class


The third garment was a dress.
I had a hard time with this zipper (inserted differently than the skirt one) and the sleeves. I was really surprised that you actually have to gather the sleeves to have non-gathered ones!

Dress Class

Grazie mille Vale for being my model during the photo shoot!
It was really fun...

Sunday, October 17, 2010

Simplicity 3503 Dress/Pool Cover-Up

I wanted to try this Simplicity 3503 pattern view B and thought a pool cover-up would be an easy go.
I used some cheap fabric from High Fashion Fabric (Houston fabric shop). I think it's a two way stretch fabric for lining swimwear. A long time ago I bought it thinking of all the swimsuits I wanted to do, but I discovered later I would need four way stretch. So this dress allowed me to make some space in my stash.

Simplicity 3503 view B


I made it simpler than the original by suppressing the lining for the belt and the tie in the back. I just wanted it really fast to sew to wear it as soon as possible. And since it was just a cover-up I wasn't too stressed by the finish.
I made a size 10 as I thought I was, without taking my measurements (I don't think I'm able to take them properly anyway). But I finally had to remove 1 or 2 inches on each size for the top part until the belt.
Simplicity 3503 dress


And after hesitating I made it quite short (way shorter than the pattern), as I though it was a great length for a cover-up. I should probably have add 2 inches.
I like the look even though the fabric is too bright. I would prefer it in a cotton knit fabric.
And the bell lining would have been nicer because you can see thru the white fabric.
And one mistake: I sewed the belt with straight stitch. It makes it difficult to enter. So next time I will probably try the stitch I used for the hem:
Simplicity 3503 cover up
I want to do it again, but I definitely need to make the top part tighter! I'm thinking about making a dress to go with my boots.

Friday, September 17, 2010

McCall 4460 dress

As promised, I'm gonna give you more details about the dress I was wearing for my sister's wedding.
It's the McCall's 4460 pattern, view B without shoulder strap.

I wanted a photo shot with the photograph on the wedding day to have nice pics of the dress to show you. But I was so busy on this day I totally forget.
So I just have the pictures I made for the Pattern Review contest (excepted for the one you've already seen two posts before, about the wedding day).

McCall 4460 wedding dress

I used a beige Dupioni silk from fabric.com and brown netting and polyester satin from JoAnn. Plus lining (polyester China silk) and underlining (organza).
I'm a little ashamed to tell you I bought Polyester fabric from JoAnn to go with silk for my sister of the bride dress (I'm blushing right now!). But I feel more confident with cheap fabrics (I was anxious to start cutting the silk!) and it makes more sens for me if I can't find nice rtw dresses for less than what I've done...
JoAnn is also the closest fabric store and you can see what you're buying (in comparison with online shops)
Maybe I'll use more natural fabrics when I will feel more confident about my sewing skills... maybe not!

Nevertheless I think my dress looks nice and maybe also expensive (?).


Here is the back view, which would have looked way better with an invisible zipper. Actually, the zipper used is an invisible one, but not knowing how to sew it on, I've sewed it as a regular one :-/

back zipper McCall 4460

And a close up of the princess seamed bodice. I'm proud of it because I spent so much time trying to make it fit properly!

Bodice pattern McCall 4460

If I had to redo it, I would:

- Use the piece of pattern I had to draw for the bodice instead of the one given (See my Pattern Review comment for that)

- Sew the invisible zipper as an invisible one. I'm now able to do so, thanks to the so nice and talented Re Becca (go to see her blog and all her pattern reviews on PR). That's so easier and nicer to make it this way than what I did! I still have to practice the bottom part, but thank you so much Becca!

- Use a cotton fabric to line the dress instead of the polyester china silk I used. Polyester was such a bad choice for this close fitting bodice to be wear in a hot summer day...


If you want more informations and pics about this pattern, go check my review on PR:
Pattern Review

Sunday, September 12, 2010

Snow White Costume, self drafted

In France we're used to costume more or less weirdly the bride-to-be and to make her do fun and crazy stuff for her bachelorette party. It's usually around a theme.
Since KiKou (my sister who is sewing with me on [Kikuyu]) has always been a big fan of all Disney's cartoons, I made a Snow White costume for her:

Snow White Costume
Isn't she a nice princess?

To make it, I used:
- a big old blue shirt (thanks dad!)
- some red fabric leftover
- some white lace trim
- a big polyester satin yellow/gold (I would say 3m (3.1/4 yard) but I'm not sure).
- a model to try on the costume-to-be: Thanks to my mom and youngest sister! (yes, all the family had to contribute for the bride-to-be gift!)

snow white sewing
I bought a black wig and added a red ribbon.
I'm happy with the finish and love the top part which was easy to make and fits greatly due to the cotton knit shirt used!

Oh... And one last thing: Do NOT forget the prince charming to wake up your princess!
snow white self draft pattern

Wednesday, August 18, 2010

Dresses for my sister's wedding

Here a pic of her in her stunning dress with her dear darling:
robe de marié KiKou
Her dress was made after her taste and instructions as a all-year-long school project for a future seamstress in her last year of sewing high school. It's a dupioni or shantung silk (I have no idea how to recognize it, since in France we just call that "wild silk").
She really loved to be able to get such a nice customized wedding dress, and trying it on a few times during the process. She was so happy with it! And seriously, that's a steal...

For this wedding I made my youngest sister's dress and mine (the one for which I decided a year ago to start sewing).
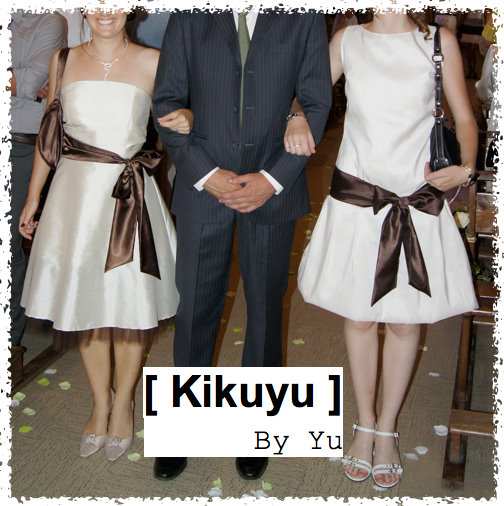
You can see her (on the right) and me around the groom's bother:
robes soeurs de la mariée
Even though in France we're not used to have bridesmaid (so no all assorted bridesmaid dresses), we though it was nice for the pictures to have matching colors.

I did my young sister dress following her wills, without a proper pattern. I also made a matching cover up like the one already made for me: Vogue 8622. But she haven't had any use for it since it was warm enough.

My dress (on the left) is the McCall's 4460 pattern. I also made a matching Buttercup Bag Made By Rae which is a really nice free pattern.

But I will tell you more about all this sewing in upcoming posts.

Congrats to my sister for her wonderful wedding! I hope you'll live happily ever after ;-)

Monday, May 17, 2010

Japan Couture Dress

I've made this purple dress with a japanese sewing book. It seems to be a trend in France among sewer to use these books, even without translation, according to the number of member on the JCA's web site.

Japan couture addicts

I used the book they call "01 - Every day camisoles et petits hauts" and made the pattern number 14.

Livre japan couture robe 14
ISBN: 978-4-579-11043-8

My realization:
japan couture robe violet

I added a lining for cold days and remove the zipper since the dress is large enough to put in. I will have to redo the lower seams since it doesn't look so great, due partly to the lining.
The fabric is the leftover from my Vogue 8527 clutch bag.

What I love with this pattern is that you can use that for a summer dress, a winter dress worn with leggings, or a tunic if you had a belt. And in purple (yes, it's purple, even if you might not see that so well on the pictures), assorted with green it's a great outfit for Mardi Gras!
I plan to make one in a white printed cotton for a classy summer dress.

Japan Couture Mardi gras

I haven't found so many english websites about japanese sewing, but you should search! They have plenty of books. Even without being able to read instructions in most of them you have pictures to illustrate the steps.
If you click on the "JCA's" picture, you will end up on this website, on a page with all the other realizations for this dress.
Even if the site is in french you can look at all the pictures just by clicking on any book front page on the left column to see what people made with that book. If you have questions don't hesitate to ask me!

Sunday, March 7, 2010

Nightgown

I made this nightgown as a Christmas gift for KiKou (the other half of the [Kikuyu] "brand"). I used a brown organic cotton knit and an orange cotton bias.
I spent a long time trying to draw the home-made pattern, and end up changing everything on the muslin directly on KiKou.

nuisette patron

I'm happy with the result but it was pretty difficult for me and I won't sew again without a pattern for a while !

nuisette nightgown