Showing posts with label Millinery (Hats). Show all posts

Monday, September 3, 2012

Wet felting to make hats

Making felt hats it THE reason that made me take the millinery class again.

Wet felting is a long and tiring process but, in my opinion, the wonderful feeling of the wool and to see it change under your eyes to become a fabric make it worse it.
To give you an idea of the work required to make felt I took some pictures during the process of my 1st attemp at making wool.
Here are the main supplies I used:


You can see the grey merino wool in the middle. Merino is know to be the easiest to felt. Since is was already quite long and tiring (in a work-out way), I must admit being shy over try other fibers.
You can see here some of the work involve in felt-making:


The pictures are mostly from the beginning of the process as I was way to busy during the rolling/throwing parts to even think about taking pictures! And yes, the second pair of hands are my teachers'.

At first, I did block this hat to be a cloche. But I later changed it for what you can see in this picture:


Yes, I speaking about the light grey hat at in the back. This is the only picture blocked I have cause I still haven't finish it. I blocked so many hat that semester that I will most likely not be done finishing them before next summer...

I also blocked the 3 other hats in the picture, but I can not brag as much about them as I simply bought the felt instead of making it!

I have to admit I loved blocking felt even more than sinamay.

Monday, August 13, 2012

My First Wedding Dress!

Last winter, I spent a great deal of time in every single bridal store in town to help my friend find her special dress. But I must say I wasn't unhappy about that. It gave me the opportunity to spy on thousands of dresses, looking for inspirations, finishing, techniques, materials...
If you're in fashion design, you know exactly what I mean.
Anyway, I loved it and wanted to try myself to sew a wedding dress but had no reason to do so. And seriously, with the amount of work & fabric involve to make such a dress, it is pointless to make one "just for fun".

When, in the Spring semester, the teachers started encouraging us to enter a fashion design competition in Dallas, I had what I was hoping for: a good excuse to spend time and money on this kind of project! I love school!

After sketching about 10 dresses, I choose to make a simple yet elegant one which would make me work on bustiers.

Here is my dress, walking on the Dallas Career Day runway:


Isn't it super pretty? Well, I know the model is not for nothing in that, but still!
I didn't win anything at the contest, but it did not matters. My design was part of the opening looks. It was so amazing to see my dress coming out on such a professional show.
I loved loved loved it.
I loved it so much that I'm now looking for as many runway as I can get for all my designs. And I'm definitly going back next year, even if I don't enter anything in the contest. I just loved this show!


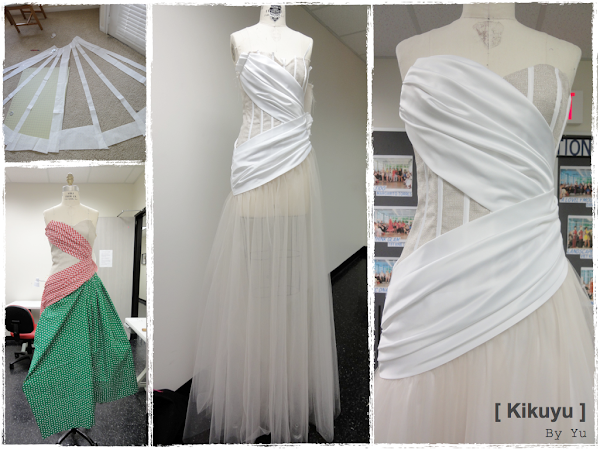
But I'm here to talk about my dress, so here are some pictures who might interest the sewer among you:


From top to bottom & left to right, you can see:
- The skirt pattern in progress
- a try out of the draped part, just for fun, with the fabrics I had on hand, on top of the just sewn bustier
- The dress, waiting to be lined
- A close-up of the finished bustier with the draped satin on top.

And because a bride as to be the prettiest under every angle, here are different views of the dress:


Here is the same dress but at the end of the year fashion show at school.
I told you I'm now showing my garment as much as possible!


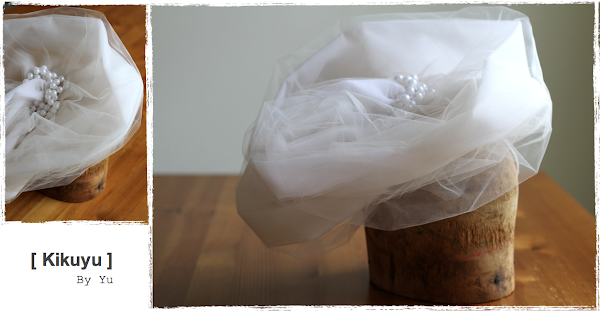
For this show, I made the head-piece during my millinery class:


I must confess that is the dress is exactly my style, I think the hat is a bit too much. Yes, I like simple things!

One last thing: I have something for see thru garments and thought for a while not lining the skirt but instead just make a matching satin short. Well, I didn't dare and just sticked with a more traditional gown. But don't you think it would have been cute?

Sunday, August 5, 2012

Millinery: Romantic headband

 For the millinery class, one of the assignments was to make a headband.

 I shaped the millinery wire into double heat shape before giving it the curve needed to fit the head.
If the head block was convenient, I liked the fact that you can do it without any wood block, as we all have a head to try it on... Which means that anyone can make this kind of hat!

After shaping the wire, I covered it with fabric for the look as much as for the comfort.
The last step was to decorate it. I made a sinamay & organza flower:

Red sinamay and organza hat

If you fell that this hat has a deja-vu feeling, it most likely means that you're one of my fellow reader. So thank you, thank you, thank you!
I made this hat to match the dress for the Strapless dress/Advanced bustier class. And it was worn by my model at the end-of-the-school-year fashion show, last Spring.
You can see it here: Strapeless Cocktail dress.
Happy Sunday!

Monday, July 30, 2012

Milinery: turban hat

One of my assignments this semester was to make a turban hat.
I know that, as soon as I said turban you had in mind this huge scarf that people complexly roll around their head in several countries. If I could have done that, I probably would have needed to stitch it in place so it does not have to be done over and over.
But in milinery a turban hat would mostly have a stiffer understructure to easily keep it's shape.
That's this kind of turban hat that I did.


I blocked the base in buckram and then covered it with the draped fashion fabric. Then I did as few hand stitches as possible in oder to keep the fabric in place without making it look stiff. Because the whole beauty of a turban hat come from the apparent simplicity of the drape and the "I'll stay in place magically" effect.

To be totally honest, I have to tell you that I first draped a squre of fabric on the top of the hat and then added some batting around the outside to give more volume. This was finally covered by a long bias strip of fabric.

And as usual, I added the lining and the sweatband. For the lining, I used a comfy cotton knit.

My original plan was to add some kind of bow in the back/side where the top creases meet. But I gave up on that as I realized I loved it simple, just worn tilted on the head.

I know that those pictures does not do it justice, but that's all I've got for now. Maybe some days I'll have pictures of the hats worn... who knows.

Happy Monday!

Monday, July 23, 2012

White sinamay summer hat

Since my millinery class, last spring, I have been willing to make hats. But I do not own any blocks and those are expensive. Plus, I wanted to learn how to make felt and block it.
Those were excuses good enough for me to take the class again.

Therefore, I was again in milinery this spring. My assignments weren't the same than the beginners'. But I really wanted to block sinamay again. So that was my 1st project:


I still had some off-white sinamay leftover but had to reorder some. After blocking 3 flat brims the last time, I picked another shape this time.
Also, I had mainly been working with neutral colors (balck, white and brown) and wanted some colors. That's how I decided to go for pink and orange. I love those colors together. Their are refreshing and definitely call for the sun.

This hat could be worn for the royal ascot as well as any ceremony. It makes me want to have a 5pm english tea:


Here are some close-up on the trimming:


I making hats again and I really enjoy it. I can't wait to post here everything I've done this spring semester... and I'm still finishing!

Have a nice week and see you next Monday.

Monday, July 18, 2011

Millinery class: Wide brim white sinamay hat with feathers

Here is my 7th and last hat made during my millinery class.
It's a wide brim white sinamay hat, trimmed with black sinamay and rooster feathers.

Sinamay hat with feathers

This hat has probably the biggest WOW factor among the 7 I made.

wide brim white hat

You can see the green shine of the black rooster feathers:

feather & sinamay, white and black

Here are some pictures during the construction: you can see the sinamay blocked on the wood blocks and the hand sewing for the sweatband.

Steps wide brim sinamay hat

Conclusion about my millinery class: I really loved making hats and I will continue to do so. I'm also thinking about taking millinery class again so I would work with felt...

So, among my 7 hats, which one is your favorite?

Wednesday, July 13, 2011

Millinery class: Black sinamay hat

Among the 7 hats I made for the class, here is my favorite:

Black Sinamay hat

I just love it! I would actually wear it wear it a little more forward.

I used black sinamay and satin for the trimmings.

Black Ceremony hat

Here a picture at the Spring Fashion show at my college:

Millinery sinamay satin hat

The steps:

Millinery black hat

For the class, we didn't have to make sinamay hat. Actually, the 5 hats I made before were enough. But the teacher was nice and since I wanted to play with sinamay, she explained to me how to do that.
I'm now a huge fan of sinamay. I love how you start with a simple bolt of sinamay "fabric" and you end up with a hat. And the possibilities are endless.

I know it doesn't look like it by the pictures, but you need quite a lot of time to make a hat. For each step, you have a whole lot of had sewing (my fingers hurt just by thinking about that...). But the final product definitely worth it!

I love it, but to wear it I still need:
1) To sew in an elastic
2) An event!!!

Hope you like it too!

Monday, July 4, 2011

Millinery class: Cocktail hat "Americana"

Today is THE day to present my other cocktail hat:
Americana

Cocktail hat Americana

This hat is sooo American: beside the colors, I used an old Levi's jean, and some 100% American silk for the trimming.

Cocktail hat silk

Here are the steps to make it, but before to create the right ambiance, a music I like:

So, the steps:
I smoothed 3 layers on the head shaped wood block (the kind I used for the 1st picture).
Each layer was moisten and really smoothed on the block, before starting with the next layer.
The first layer was a black satin (lining), the second was the buckram (you can see it on the picture below), and the third was the jean.
Once everything is totally dry, I had to decide the shape I wanted it. I did a drop:

Cocktail hat

Next, I added a metal wire all around, before sewing some bias (hand sewn!)

I added a comb inside the hat to make it stand on the head. The last step is the trimming: the silk flower!

Happy Fourth of July!!!


Friday, July 1, 2011

Millinery class: Cocktail hat "Bird of paradise"

I called this cocktail hat "Bird of Paradise" for its similarity with the flower.

Cocktail Hat bird of paradise
The yellow dots are only my pins...

The side view make the name even more obvious.
I lightened the picture so you can see the pleats and texture in the black wool.

millinery cocktail hat

The white triming is in sinamay. I lined this hat with a vintage American silk scarf (you'll see mor eof this fabric in the next post... on July 4th!).

Friday, June 24, 2011

Millinery class: My straw hat

Now that you know how to block a hat, here is the first hat I did block:

Millinery straw hat


Straw hat

The teacher asked us to bring an old straw hat to refurbish it. I was lucky enough to get one for free and not having to drive all around town 'cause the school was giving away this one just the day after!
You can see the before/during/after here:

refurbishing a straw hat

I think it was some kind of gardener hat, but didn't have any shape anymore. I first wanted to make a cowboy hat out of it: it was rodeo time, here in Houston. But after blocking it, I realized it was kinda awful.

So I blocked it again, and made a more formal hat. The formal look is due to the shape of the wood block and the satin trimming. This hat would be perfect for a wedding!

Even though it looks easy, I'm still amazed by the amount of time you have to work on a single hat! Just to hand sew the sweatband always take me forever!

Monday, June 20, 2011

Millinery class: Blocking a hat

I deeply loved to learn millinery. I'd love to become a milliner.
You've already seen my beret and pillbox.
For the 5 others hats I made for the class, we needed to block.
So here are all the blocks available at the college.

blocs a chapeaux
I WANT the same closet! Isn't it a dream?

I'm so in love with the large choice of blocks!
On the left closet, you can see the steam maker we used.

So here is how to block a hat:
  1. You choose the wood block you want and you cover it with some plastic wrap (to avoid any stain on your hat and any damage on the wood block)
  2. Moisten your straw/buckram/fabric/felt/hat
  3. With steam and your hands, make your material smooth on the block by using pins/strings/elastics to maintain it as you go
  4. You can add some stiffener if needed
  5. Let it dry on the block (we let them a week, until the next class)
Tadam! You blocked your hat.
You now have to sew the different part together, add a sweatband and trim it!


Here are several of my hats drying:

mes chapeaux qui sechent

You can see straw (the pinky one on the 1st pic, that's a vintage hat I still have to finish), sinamay (brown, black and white - I'll do the brown... later!) and fabric + buckram (1st pic, to make cocktail hats) .

I need blocks at home to continue making hats!!!

Wednesday, June 15, 2011

Millinery class: Pillbox hat

After my béret, here is the second hat I did for the millinery class.
It's a pillbox hat.

pillbox millinery

The fabric is shinny, so It's not easy to get the real color on picture. I guess the picture below is somehow closer to the real fabric, but een for the eye, this fabric looks more or less dark. But I love it (I'd like to make a bustier out of that!)

Millinery pillbox hat

Here are the steps to make it. You can see the inside Buckram and the metal wire I sew inside (3 wires in all).

pillbox details

The hat looks even better on me. With that on, I'm as glamour as Jacky Kennedy with her pillbox! I have to find a dress to go with, though...

Monday, June 13, 2011

Millinery class: my beret

During the spring semester, I took not only a sewing class at the community college, but also a millinery one. I really enjoyed this class.
I've always loved trying on hats, even though I'm too shy to actually wear them.

I made 7 hats there and I'm gonna present you all of them.
So let's start today with the first one we made: a shirred beret.

Millinery beret

I cut this dress to make the beret.
I lined it and put some Buckram to make the band around the head stiff enough. I sewed in a sweatband. For the bow I used lace and satin.

Even though I wasn't really thrilled by the idea of sewing a beret (not really what I expected from a millinery class and... being french, that's too much of a cliché!), I like the outcome.

Unfortunately this shape doesn't do me any favor...
On the other hand, it looks really cut on one of my friend. So now it's hers!